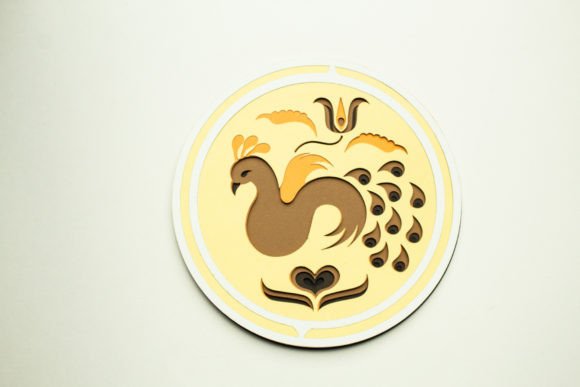
Bringing Spring to Life with the Bird and Tulips Layered Design
There is a specific kind of satisfaction that comes from pulling a perfectly layered paper craft out of your cutting machine. It's that moment when the flat sheets of cardstock transform into something with depth, shadow, and life. The Bird and Tulips Layered Design captures exactly that feeling. It isn't just a digital file; it is a blueprint for creating dimensional art that feels handmade and thoughtful. Whether you are a seasoned scrapbooker, a small business owner looking for unique inventory, or a parent wanting to make something special for a teacher, this design offers a versatile foundation for creativity.
At its core, this design features a delicate interplay between nature's early harbingers: vibrant tulips and a perched bird. The "layered" aspect is crucial here. Unlike a simple silhouette, this file is broken down into multiple distinct pieces that stack upon one another. This stacking creates natural shadows and highlights, giving the final project a 3D effect without needing complex foam adhesives or bulky embellishments. When you download this package, you aren't getting just one image. You will receive this Bird and tulips layered design in the following format: SVG, PDF, EPS, PNG, and DXF. This variety ensures compatibility whether you are using a Cricut, Silhouette, Brother ScanNCut, or even working manually with exacto knives and printed templates.
Why Layered Designs Matter for Real-World Projects
You might wonder why someone would choose a layered file over a single-cut image. The answer lies in the finish. Single-layer cuts often look flat and can feel a bit generic, especially if the material color doesn't provide enough contrast. Layered designs solve this by allowing you to use different shades of the same color family or contrasting tones to mimic lighting and texture.
For instance, with the tulips in this design, you can use a deep magenta for the base layer, a medium pink for the mid-tone, and a soft blush for the top highlights. The bird can similarly be built up with varying shades of blue or grey to show feather detail. This technique elevates a simple craft into something that looks professionally manufactured. Included in the download, you will receive a pdf with detailed instructions on how to create the craft. This guide is invaluable for beginners who might be intimidated by sorting dozens of small pieces, as it walks you through the assembly order to ensure the layers align perfectly.
Practical Applications for Creators and Hobbyists
The versatility of the Bird and Tulips Layered Design means it fits seamlessly into various stages of life and work. Let's look at how different people actually use these files in their daily routines.
- Greeting Card Makers: For those who sell handmade cards on Etsy or at local craft fairs, time is money. This design allows for batch production. You can cut ten sets of layers in one go. Because the design is intricate yet structured, it appeals to customers looking for "premium" feel cards for Mother's Day, Easter, or spring birthdays. The 3D element makes the card stand out in a pile of flat envelopes.
- Home Decor Enthusiasts: Imagine framing this design. When mounted on a sturdy background, it becomes a piece of wall art perfect for a sunroom, nursery, or entryway. By using high-quality materials, the result rivals store-bought decor but costs a fraction of the price. It adds a touch of seasonal freshness that can be swapped out as the weather changes.
- Educators and Classroom Decor: Teachers are always in need of visually engaging materials. This design works beautifully for bulletin board borders or as part of a spring-themed lesson plan about nature, migration, or plant life cycles. The clear separation of layers can even be used as a teaching tool to discuss anatomy of flowers or birds in a tactile way.
- Event Planners and Party Hosts: If you are organizing a bridal shower, baby shower, or a garden party, these layered cutouts make exceptional table scatter, cake toppers, or favor tags. They add a cohesive theme to the event without requiring expensive floral arrangements that wilt after a few hours.
Material Matters: Choosing the Right Cardstock
The success of any layered project hinges heavily on the material you choose. If the paper is too thin, the layers may warp or fail to hold their shape, ruining the 3D effect. If it is too thick, it might not cut cleanly or could jam your machine. For the Bird and Tulips Layered Design, precision is key because of the many small details involved in the bird's wings and the tulip petals.
All cardstock featured is Encore Cardstock 80 lb cover 216 gsm. This specific weight is the sweet spot for layered papercrafting. It is heavy enough to provide structural integrity so the layers pop off the page, yet flexible enough to cut intricate details without tearing. The 80 lb cover weight ensures that when you adhere the layers, they don't buckle under the weight of the glue. It provides a smooth finish that takes ink well if you decide to add hand-drawn details or shading with markers.
Finding the right supply can sometimes be a hunt, but having a reliable source makes the workflow smoother. Click here to visit 12×12 Cardstock Shop. This is a paid link at no extra cost to you. Having a consistent supply of this specific gram weight means you can replicate your projects with uniform quality every time, which is essential if you are building a brand or selling your creations.
Considerations Before You Start Cutting
Before you hit the "make" button, there are a few practical things to consider to ensure your project goes smoothly. First, think about your color palette. While the default might be spring pastels, this design adapts well to monochromatic schemes (all whites and creams for a wedding) or bold, high-contrast colors for a modern look. Plan your layers before cutting to avoid wasting material.
Second, consider the end use. Will this item be handled frequently, like a bookmark or a gift tag? If so, you might want to laminate the top layer or use a sealant to protect the edges from fraying. If it is for wall art, ensure your adhesive is strong enough to hold the weight of the stacked paper over time; double-sided tape designed for scrapbooking usually works better than liquid glue, which can cause warping.
Finally, patience during assembly is your best tool. Layered designs require a steady hand. Use tweezers for the smallest pieces, particularly around the bird's beak or the center of the tulip. Rushing this stage can lead to misalignment, which breaks the illusion of depth. Take your time to dry-fit the layers before applying adhesive permanently.
Turning Digital Files into Tangible Value
In a world dominated by screens, there is a growing appreciation for tangible, handmade items. The Bird and Tulips Layered Design bridges the gap between digital convenience and analog beauty. It allows freelancers to offer custom physical products, helps parents create meaningful memories with their children, and gives entrepreneurs a low-overhead product to sell.
The inclusion of multiple file formats means you are never locked out. If you switch from a Cricut to a laser cutter next year, the DXF or SVG files will still work. If you need to send the design to a professional print shop, the PDF and EPS files are industry standards. This longevity makes the download a worthwhile investment for your creative toolkit.
Ultimately, the value of this design isn't just in the lines and curves of the vector file; it's in what you build with it. Whether it's a quiet afternoon project to de-stress or a batch of products for your online store, the Bird and Tulips Layered Design provides the structure you need to let your creativity take flight. With the right cardstock and a bit of patience, you can turn a simple download into a cherished keepsake or a profitable product line.